A while ago, I started working on a dataset I captured a few years ago with a Microsoft Kinect One.
I immediately realized the data looked much cleaner than the newer datasets I created with my Intel RealSense D435.
I had already noticed that, above a certain distance, the depth data was full of craters. I already knew the error is proportional to the squared distance, but for me, it was much bigger than expected. Therefore, I calibrated the sensors and now I stay closer to my targets during the acquisitions.
But for the last dataset I captured, I tried another strategy: I decided to save also the raw IR footage to process it offline.
Stereo vision
RealSense cameras are RGBD sensors: they provide simultaneously a color (RGB) and depth (D) stream.
There are several types of techniques to measure depth. For example, the original Kinect for the Xbox 360 uses “structured light”, and the Kinect One included a time-of-flight camera.
The RealSense D400 series is based on stereo vision, which works by matching the same point in frames captured by two different cameras. There is a relation between the displacement of this point (disparity), the relative position of the two cameras, and the depth.
Matching point is the hard part. A way to simplify it is to rectify the images, i.e., make them co-planar. However, the problem remains difficult; thus, Intel developed specialized chips to resolve it in real-time.
Since I process the data offline, I realized I can save and process the two IR streams offline and possibly get improved depth maps.
Calibration
Before elaborating this data, we need to calibrate the RealSense. OpenCV provides all the functions we need (thanks!), and I wrote some helpful scripts in my RGBD toolbox. We need to do it once, and then the results can reused for all the subsequent acquisitions.
The calibration involves capturing some frames of a chessboard pattern. Please refer to OpenCV’s tutorial to get a pattern to print. I generated a new SVG rather than printing the PNG available on GitHub to avoid upscaling when printing (even though I suspect the RealSense’s noise to be more impactful than any print artifact 😄).
I also wanted to avoid errors due to camera movements or shaking. Therefore, for the calibration, I used a tripod. My RealSense came with a small one in its box, but its threading is standard; thus, if you already have a camera tripod, it should work.
The calibration process needs at least 10 usable frames taken from different views. With a bag file, you would end up cherry-picking a minimal minority of frames. So, I created a script to acquire single frames instead of an entire sequence.
When capturing for calibration, you should turn off the IR emitter because its pattern will prevent OpenCV from detecting the chessboard. My script supports a --no-projector command line flag, but I did not manage to get that to work on Linux. Probably the reason is I did not install librealsense2’s kernel modules; on Windows, it worked as expected.
Once you have acquired the calibration dataset, you can pass it to stereo-calibrate.py. The script will:
- find the intrinsic and distortion parameters of each camera with
calibrateCamera; - find the relative positions of the stereo pairs (IR left-right, IR left-color) with
stereoCalibrate; - create the maps to rectify the IR pair with
stereoRectifyandinitUndistortRectifyMap; - save all the relevant data in a NumPy compressed
.npzarchive.
Notice we treat the IR left and color cameras as an additional stereo pair because we want to know the transformation matrix for aligning the color frame to the depth data, but we are not rectifying them.
The pipeline
To acquire a new dataset, we can follow this pipeline:
- acquisition of the IR and RGB data in the
.bagformat; - extraction of the frames from the bag as image files;
- rectification of IR pairs with OpenCV;
- creation of disparity maps from rectified IR pairs;
- conversion of disparity to depth and alignment with RGB data.
Acquisition and rectification
The first step is to enable infrared streams in the configuration. With the RealSense viewer, it is as easy as selecting the various checkboxes in the stereo module. With USB 3.x, you can keep both depth and IR turned on.
However, you might want to disable the IR projector depending on how you will match frames to create the disparity maps. But this will greatly reduce the quality of the depth computed in hardware to the point it might be unusable, thus a waste of resources.
In the SDK, infrared streams are 1-indexed: 1 is left, and 2 is right. Initially I thought they were 0-indexed, and I got unexpected results.
After acquisition, we have to rectify the frames to process them. We can use OpenCV’s remap function with the maps created during the calibration.
Remapping involves interpolation. In stereo-rectify.py, lanczos4 is the default algorithm, but others can be chosen through the command line. However, I have not checked the differences between the various choices for this use case, so this might be a bad default.
The repository I linked above contains a script to extract the data from a RealSense .bag (IR can be enabled with --save-ir) and a script to rectify frames.
Matching and disparity map creation
Three years ago, I wrote Python bindings for libelas, a library that performs stereo matching.
However, I checked if checked if there have been new developments since then. As I had already written back then, computer vision developments happen mostly with AI. When I tried a few AI-based projects in the past, I always found their setup step very hard. So, in general, I tended to avoid them.
This time, I decided to give them another shot, as some sites and papers mentioned AANet as one of the best stereo matching projects. However, its authors suggested in its readme to switch to unimatch, and so did I.
Its repository includes a 2-year-old pip_install.sh script. It did not work for me because the Python version shipped by the current Debian testing (3.11.8) is too new. Luckily, unimatch works also with the most recent version of PyTorch (at the moment of writing), despite the seemingly major updates between 1.9.0 and 2.2.2 🎉.
Initially, I built Python 3.9.x from the source code and used my CPU for inference, but it was very slow: one pair took around 45 seconds. The more recent Torch allows me to use my GPU, which can infer around 50 pairs in the same amount of time.
Unimatch’s repository does not include pre-trained weights, but it tells where to download them. I chose GMStereo-scale2-regrefine3-resumeflowthings-mixdata.
Then, I used a command similar to the one of scripts/gmstereo_demo.sh. I changed --inference_dir with --inference_dir_left and --inference_dir_right, and I added --save_pfm_disp to save also the raw disparity, in addition to the colormaps.
Depth creation and color alignment
Switching from disparity and depth is almost trivial: depth is the reciprocal of the disparity, multiplied by the baseline-focal length product.
We can open the PFM format with OpenCV by passing the IMREAD_UNCHANGED flag. In this way, we obtain a floating-point depth image. We could save it in PFM as well, but it is not a compressed format. Therefore, a single 1280×720 frame would be almost 3.7MB, whereas an optimized 16-bit grayscale PNG is around 1MB for an equal resolution (depending on the content).
The default scale of many libraries is 1 unit = 1mm, which makes 65m the maximum depth range. While a 1mm precision is probably fine for many applications, this scaling is a waste of range.
PNG files can embed comments, and they can have a key. Therefore, by default, my script normalizes the depth, rescales it to the maximum 16-bit integer, and saves the resulting scale factor in a depth-scale comment. Otherwise, a scaling can be specified in the command line if preferred.
The script also creates a new color image aligned to the new depth view: it converts the disparity to 3D points (with reprojectImageTo3D, which needs the Q matrix from the rectification process) and then projects them in the color view (with projectPoints). This latter function is very convenient because it also accepts the transformations in the 3D space and the color sensor distortion parameters.
Moreover, reprojectImageTo3D returns an array with a point for every disparity pixel. As a consequence, the result of projectPoints also has a point for each pixel and can be used as an argument of remap without further transformations.
Many points returned by projectPoints might be outside the color frame because the RealSense color camera’s field of view is narrower than IR cameras’. In my initial tests, this reduces the usable depth data down to a 900×500 rectangle from an initial one of 1280×720.
I decided was to mark the depth as invalid for such points by default. I wonder if, as an optimization, it could be worth cropping the data before computing the disparity maps.
The output of unimatch seems continuous (at a glance, not from a rigorous mathematical point of view). However, depth discontinuities would be fine, for example, near the borders of an object. This continuity results in bad-looking clouds along the depth axis. OpenCV has a disparity filter, but I have not tested it. Open3D’s outlier filter will remove them in the 3D domain. A smoothing filter would also be interesting.
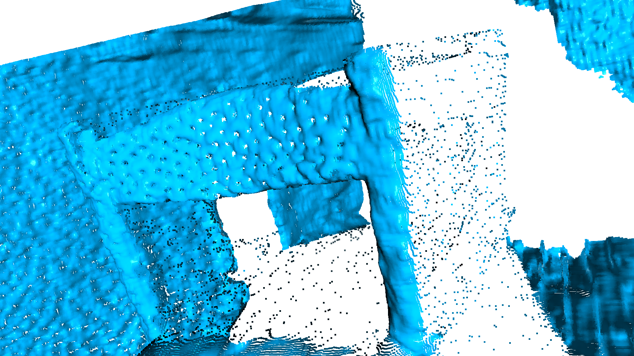
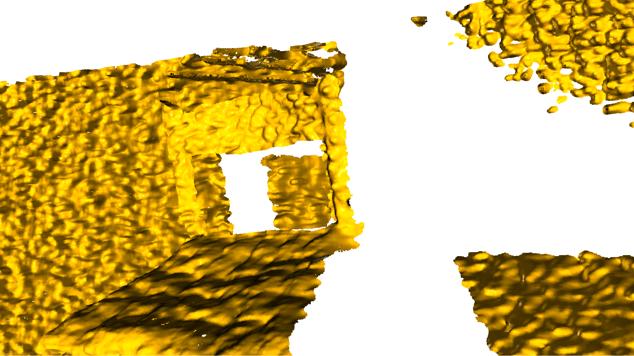
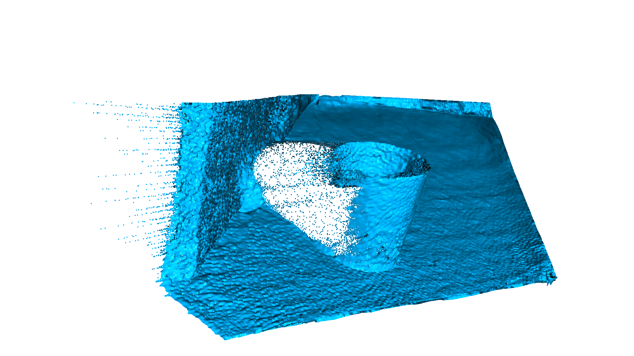
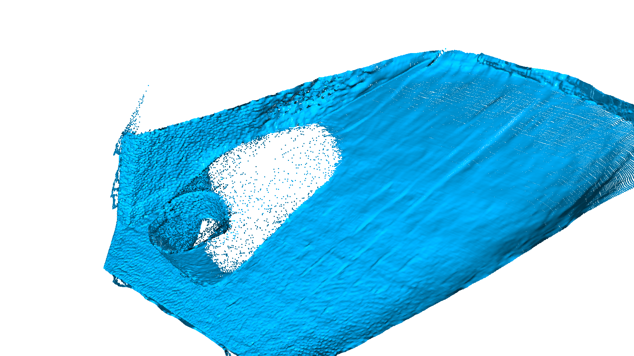
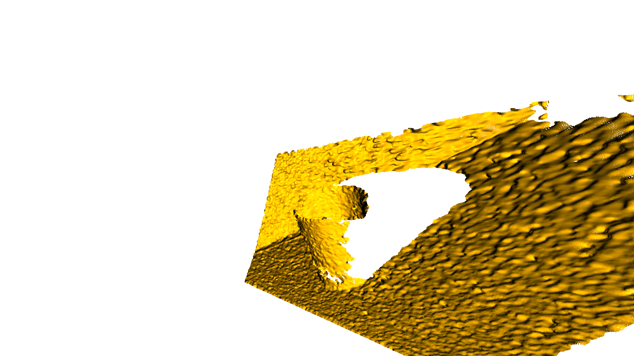
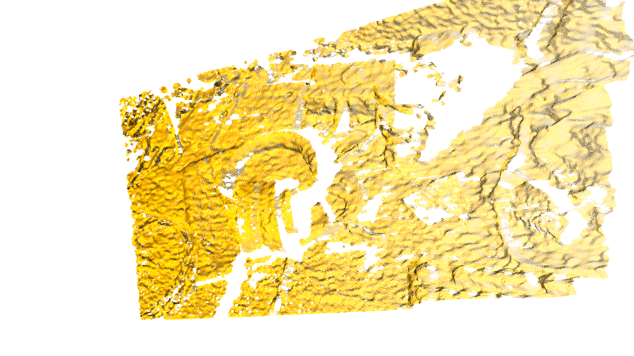
Here are some quick shots I captured to compare the two methodologies:
To be fair, I did not choose a preset for the ASIC, and it might have produced better results with other presets. However, I think at least saving the raw IR data is worth. I am thinking of disabling the projector and the depth stream for my next acquisitions.

